
In this example we will use a sensor to detect various colours, the sensor in question this time is a VEML6040
VEML6040 color sensor senses red, green, blue, and white light and incorporates photodiodes, amplifiers, and analog / digital circuits into a single chip using CMOS process.
With the color sensor applied, the brightness, and color temperature of backlight can be adjusted base on ambient light source that makes panel looks more comfortable for end user’s eyes. VEML6040’s adoption of FiltronTM technology achieves the closest ambient light spectral sensitivity to real human eye responses.
VEML6040 provides excellent temperature compensation capability for keeping the output stable under changing temperature. VEML6040’s function are easily operated via the simple command format of I2C (SMBus compatible) interface protocol. VEML6040’s operating voltage ranges from 2.5 V to 3.6 V.
Schematics/Layout
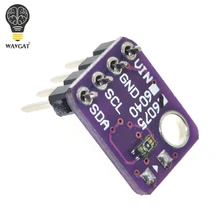
Couldn’t find a good fritzing part but its a simple sensor to connect up
| Module | chipKit MAX32 |
| Vin | 3.3v |
| Gnd | Gnd |
| SDA | SDA |
| SCL | SCL |
Code
Again we use a library this time its this one – https://github.com/thewknd/VEML6040
[codesyntax lang=”cpp”]
#include "Wire.h"
#include "veml6040.h"

VEML6040 RGBWSensor;

void setup()
{
  Serial.begin(9600);
  Wire.begin();
  if(!RGBWSensor.begin())
  {
  Serial.println("ERROR: couldn't detect the sensor");
  while(1){}
  }

  /*
  * init RGBW sensor with:
  * - 320ms integration time
  * - auto mode
  * - color sensor enable
  */

  RGBWSensor.setConfiguration(VEML6040_IT_320MS + VEML6040_AF_AUTO + VEML6040_SD_ENABLE);

  delay(1500);
  Serial.println("Vishay VEML6040 RGBW color sensor auto mode example");
  Serial.println("CCT: Correlated color temperature in \260K");
  Serial.println("AL: Ambient light in lux");
  delay(1500);
}

void loop()
{
  Serial.print("RED: ");
  Serial.print(RGBWSensor.getRed());
  Serial.print(" GREEN: ");
  Serial.print(RGBWSensor.getGreen());
  Serial.print(" BLUE: ");
  Serial.print(RGBWSensor.getBlue());
  Serial.print(" WHITE: ");
  Serial.print(RGBWSensor.getWhite());
  Serial.print(" CCT: ");
  Serial.print(RGBWSensor.getCCT());
  Serial.print(" AL: ");
  Serial.println(RGBWSensor.getAmbientLight());
  delay(400);
}
[/codesyntax]
Output
Open the serial monitor – now place different coloured objects close to teh sensor and you will see the values change
RED: 20612 GREEN: 8081 BLUE: 3505 WHITE: 30063 CCT: 1291 AL: 254.23
RED: 18325 GREEN: 7051 BLUE: 3117 WHITE: 27449 CCT: 1266 AL: 221.82
RED: 18243 GREEN: 7024 BLUE: 3121 WHITE: 27399 CCT: 1269 AL: 220.98
RED: 47533 GREEN: 25921 BLUE: 8909 WHITE: 59081 CCT: 1815 AL: 168.41
RED: 6099 GREEN: 2616 BLUE: 1008 WHITE: 18451 CCT: 1404 AL: 82.30
RED: 6049 GREEN: 2592 BLUE: 995 WHITE: 18338 CCT: 1401 AL: 81.54
RED: 6040 GREEN: 2587 BLUE: 989 WHITE: 18355 CCT: 1402 AL: 81.92
RED: 6155 GREEN: 2668 BLUE: 1011 WHITE: 18535 CCT: 1417 AL: 83.94
Links
https://www.vishay.com/docs/84276/veml6040.pdf
VEML6040 Breakout Vishay RGBW Sensor Module
