
On to another Arduino shield and this is one of my favourites, its a low cost shield which contains a variety of resources on it making it ideal for beginners. We will again connect this to a Chipkit Max32 and the examples will be written in the arduino IDE
here is a picture of the shield
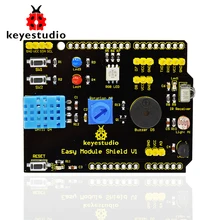
Features
You can see most of the features but here is a quick summary of what is fitted to the shield
two LEDs
two switches
reset button
Measuring temperature and humidity with DHT11 temperature and humidity sensor
Using revolving potentiometer to do analog input
passive buzzer module
Full-color RGB LED
Utilizing photovaristor to detect the brightness of light
LM35D temperature sensor
infrared receiver
2-channel digital port(D7.D8)
1-channel analog port(A3)
Code Examples
None of these examples need any external libraries,
Button example 1
[codesyntax lang=”cpp”]
const int buttonPin = 3;     // the number of the pushbutton pin
const int ledPin =  12;      // the number of the LED pin

int buttonState = 0;         // variable for reading the pushbutton status

void setup()
{
  // initialize the LED pin as an output:
  pinMode(ledPin, OUTPUT);
  pinMode(buttonPin, INPUT);
}

void loop()
{
  // read the state of the pushbutton value:
  buttonState = digitalRead(buttonPin);
  // check if the pushbutton is pressed.
  // if it is, the buttonState is LOW:
  if (buttonState == LOW)
  {
    // turn LED on:
    digitalWrite(ledPin, HIGH);
  }
  else
  {
    // turn LED off:
    digitalWrite(ledPin, LOW);
  }
}
[/codesyntax]
Button example 2
[codesyntax lang=”cpp”]
const int button1Pin = 2;     // the number of the pushbutton pin
const int button2Pin = 3;
const int led1Pin =  12;      // the number of the LED pin
const int led2Pin =  13;

int button1State = 0;         // variable for reading the pushbutton status
int button2State = 0;

void setup()
{
  // initialize the LED pin as an output:
  pinMode(led1Pin, OUTPUT);
  pinMode(led2Pin, OUTPUT);
  pinMode(button1Pin, INPUT);
  pinMode(button2Pin, INPUT);
}

void loop()
{
  // read the state of the pushbutton value:
  button1State = digitalRead(button1Pin);

  // check if the pushbutton is pressed.
  // if it is, the buttonState is LOW:
  if (button1State == LOW)
  {
    digitalWrite(led1Pin, HIGH);
  }
  else
  {
    digitalWrite(led1Pin, LOW);
  }

    // read the state of the pushbutton value:
  button2State = digitalRead(button2Pin);

  // check if the pushbutton is pressed.
  // if it is, the buttonState is LOW:
  if (button2State == LOW)
  {
    digitalWrite(led2Pin, HIGH);
  }
  else
  {
    digitalWrite(led2Pin, LOW);
  }
}
[/codesyntax]
LED example
[codesyntax lang=”cpp”]
#define redLed 12
#define blueLed 13

void setup()
{
  pinMode(redLed, OUTPUT);
  pinMode(blueLed, OUTPUT);
}

void loop()
{
  digitalWrite(redLed, HIGH);   // turn the LED on (HIGH is the voltage level)
  digitalWrite(blueLed, LOW);    // turn the LED off by making the voltage LOW
  delay(1000);
  digitalWrite(redLed, LOW);    // turn the LED off by making the voltage LOW
  digitalWrite(blueLed, HIGH);   // turn the LED on (HIGH is the voltage level)
  delay(1000);
}
[/codesyntax]
POT example
[codesyntax lang=”cpp”]
#define vrPin A0

void setup()
{
  // initialize serial communication at 9600 bits per second:
  Serial.begin(9600);
}

void loop()
{
  // read the variable resistor on analog pin 0:
  float vrValue = analogRead(vrPin);
  // Convert the analog reading to a voltage
  float vrVoltage = vrValue * (5.0 / 1023.0);
  // print out the Variable resistor value you read:
  Serial.print("Variable resistor : ");
  Serial.println(vrVoltage);
  delay(1000);
}
[/codesyntax]
RGB led example
[codesyntax lang=”cpp”]
#define redLed 9
#define greenLed 10
#define blueLed 11

void setup()
{

  pinMode(redLed, OUTPUT);
  pinMode(greenLed, OUTPUT);
  pinMode(blueLed, OUTPUT);
}

void loop()
{
  for (int i=0; i <= 255; i++)
  {
    setColor(i, 0, 0);  // red
    delay(10);
  }
}

void setColor(int red, int green, int blue)
{
  analogWrite(redLed, red);
  analogWrite(greenLed, green);
  analogWrite(blueLed, blue);
}
[/codesyntax]
Links
$10 for one of these shields
keyestudio Multi-purpose Shield V1 for arduino starter
