
The MLX90614 is a non-contact infrared thermometer with a measurement range from -70 to +380 degree Celsius. Just connect the four leads to your Wemos and you will have a accurate thermometer with a resolution of 0.01 and a accuracy of 0.5 degrees, or for that matter you can use any microcontroller that can communicate with it through it’s I2C interface.
Being an I2C device you simply need to connect to the SDA, SCL and choose a suitable GND and Vin. I used 3.3v to be safe, although the breakout states 3 to 5v.
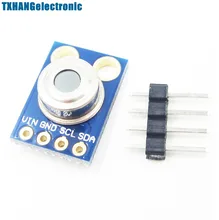
This version I chose comes with a breakout board with all of the components needed for operation. Here is a picture of that breakout board
Features:
Small size, low cost
Mounted on a breakout board with two types of pins
10k Pull up resistors for the I2C interface with optional solder jumpers
Factory calibrated in wide temperature range:
-40 … + 125 ° C for sensor temperature and
-70 … + 380 ° C for object temperature.
High accuracy of 0.5 ° C over wide temperaturerange (0 … + 50 ° C for both Ta and To) High (medical) accuracy calibration
Measurement resolution of 0.02 ° C
Single and dual zone versions
SMBus compatible digital interface
Customizable PWM output for continuous reading
Sleep mode for reduced power consumption
Connection
VIN -> Chipkit uno 3.3v
GND -> Chipkit uno GND
SCL -> Chipkit uno A5
SDA -> Chipkit uno A4
Code
The sketch below is fairly straightforward, most of the work is done in the Adafruit MLX96014 library which outputs the result via the serial monitor
[codesyntax lang=”cpp”]
#include <Wire.h>
#include <Adafruit_MLX90614.h>

Adafruit_MLX90614 mlx = Adafruit_MLX90614();

void setup()
{
Serial.begin(9600);
mlx.begin();
}

void loop()
{
Serial.print("Ambient = ");
Serial.print(mlx.readAmbientTempC());
Serial.print("*C\tObject = ");
Serial.print(mlx.readObjectTempC());
Serial.println("*C");
Serial.print("Ambient = ");
Serial.print(mlx.readAmbientTempF());
Serial.print("*F\tObject = ");
Serial.print(mlx.readObjectTempF());
Serial.println("*F");

Serial.println();
delay(1000);
}
[/codesyntax]
Output
Open up the Serial monitor window and you should see something like the following, the interesting one is the object temperature and how it varied when I placed an object in front of the sensor, the ambient reading stayed the same
Ambient = 22.13*C Object = 46.25*C
Ambient = 22.13*C Object = 46.25*C
Ambient = 71.83*F Object = 115.25*F
Ambient = 22.91*C Object = 68.71*C
Ambient = 73.24*F Object = 155.68*F
Ambient = 23.89*C Object = 64.25*C
Ambient = 75.00*F Object = 147.65*F
Ambient = 24.79*C Object = 58.79*C
Ambient = 76.62*F Object = 137.82*F
Ambient = 25.45*C Object = 54.07*C
Ambient = 77.81*F Object = 129.33*F
Ambient = 26.09*C Object = 50.89*C
Ambient = 78.96*F Object = 123.60*F
Ambient = 26.59*C Object = 48.17*C
Links
Here is a link to the datasheet and also a breakout
