
In this example we connected a 4X4 Key-pad shield with display interface from http://store.iteadstudio.com/index.php?main_page=product_info&products_id=308
Here is a picture of the shield minus the LCD5100 display, as you can see it provides you with a number of keys that could be use din other examples, we will look at these in a subsequent article
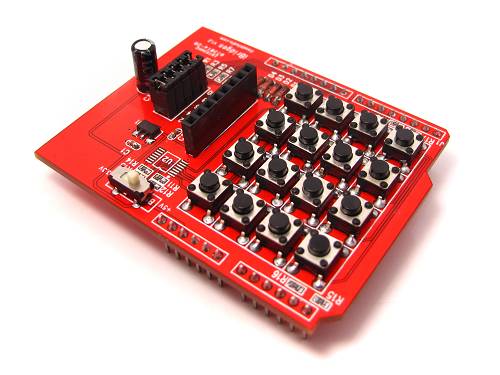
4X4 Key-pad shield with display interface
There are 3 libraries that were created by http://www.rinkydinkelectronics.com/, I recommend downloading them all, unzip them and put them in your mpide libraries folder, on my system that was in C:\Users\YourUserName\Documents\mpide\libraries
Code
This example is simply the test example supplied, it will display Chipkit logo and the OSH logo
[codesyntax lang=”cpp”]
// LCD5110_Bitmap
// Copyright (C)2015 Rinky-Dink Electronics, Henning Karlsen. All right reserved
// web: http://www.RinkyDinkElectronics.com/
//
// This program is a demo of how to use bitmaps.
// You can also see how to use invert().
//
// This program requires a Nokia 5110 LCD module.
//
// It is assumed that the LCD module is connected to
// the following pins.
//      SCK  - Pin 8
//      MOSI - Pin 9
//      DC   - Pin 10
//      RST  - Pin 11
//      CS   - Pin 12
//
#include <LCD5110_Basic.h>

LCD5110 myGLCD(8,9,10,11,12);

extern uint8_t ck_logo[];
extern uint8_t oshw_logo[];

void setup()
{
  myGLCD.InitLCD();
}

void loop()
{
  myGLCD.drawBitmap(0, 8, ck_logo, 84, 32);
  delay(4000);
  for (int i=0; i<2; i++)
  {
    myGLCD.invert(true);
    delay(500);
    myGLCD.invert(false);
    delay(500);
  }
  delay(4000);

  myGLCD.clrScr();
  myGLCD.drawBitmap(14, 0, oshw_logo, 56, 48);
  delay(4000);
  for (int i=0; i<2; i++)
  {
    myGLCD.invert(true);
    delay(500);
    myGLCD.invert(false);
    delay(500);
  }
  delay(4000);

  myGLCD.clrScr();
}
[/codesyntax]
Links
5110 4X4 Keypad Shield ibridge for Arduino
